Friday 28 February 2014

SET DRIVEN KEYS, in simple english

Yo all, Jake here, i keep getting Q's about set driven keys, i know you can look anywhere on the internet and find info on them but i'm posting this just expand the information going, and i will do a quick walk though on set driven keys on blend shapes, so here we go.

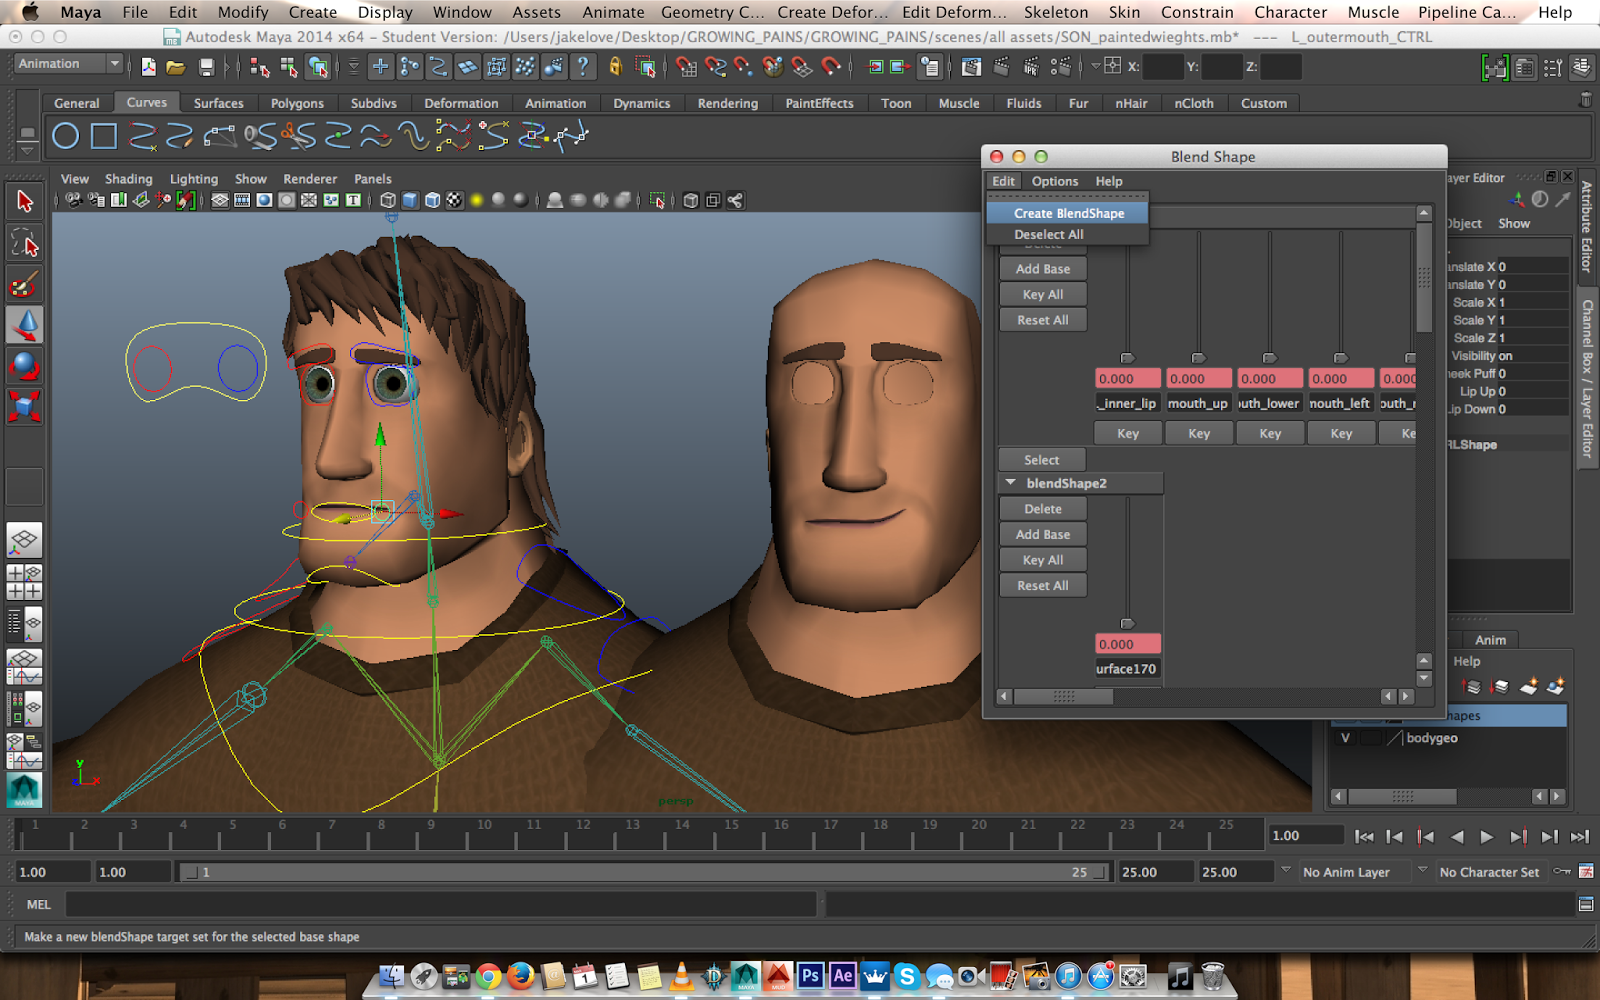
step 1. make a blend shape, duplicate your original model and manipulate the vertices until you're happy with the finished shape, you can make this by clicking the duplicated model then shift selecting the original, then, going into window > animation editors > blend shape, then go into edit blend shape > create blend shape.


step 2. create controller, for the mouth, eyes, eyebrows, whatever you fancy (make sure you freeze your, transformations) and parent them to the head controller for your rig, or just the head geometry if you are practising. 


step 3. now, you can choose weather to add an attribute, by opening up the attributes, and clicking edit > add attribute or right click on translate, rotate, scale axis to create the driven key, in this example we are going to use a smile with the Y axis.

step 4. open your blend shape editor (refer to step . 1) right click on the 0.00 below the control handle and click SET DRIVEN KEY, when your little option box opens up you need to click on your controller. Press load driver (this will drive the blend shape in the axis or attribute you want to control) then on the top part of the window (where your controller appears) click on the attribute that you want the driver to move in in this example press translate Y.


step 5. don't move the controller, press KEY, so that it knows where to start from

step 6. move your controller to where you want the blend shape to move using the Y axis (or turn your custom attribute to 10 or whatever you put the maximum).


step 7. turn your blend shape on (using the blend shape editor), and press key, TA DA! now, unless my explanation is crap, your controller should move your blend shape about and you can use this method for the rest of them and have a nice looking rig.

just so you know, you can make your rig and do blend shapes afterwords or before skinning. also it is better to skin your rig in separate parts because with blend shapes you will run into less problems.

also feel free to comment on this method of retrieving info

Monday 24 February 2014

Blend shapes, i like them

here's some of the sons facial expressions i made with my blends 

Rigging and stuff

yo, so we have been very busy making the rigs for these characters, and they're coming along nicely, so ill show what we've been up to. Basically, we're making blend shape rigs, with quite a basic set up, set driven keys in the hands and feet, using a reverse foot joint system.


 The father and Charlatan both are wearing long sleeve clothes so their wrists are hidden by the cuffs of their tops, whereas the son has rolled up sleeves, and he is rather muscly so i had to find a way of giving him a forearm twist.  This is so the arm can pronate and supernate, using a method close to a quaternion slerp. It uses multi/divide nodes to half the rotation of the previous joint (or whatever divide i choose) mine was 0.500, 0.500, 0.250.


Monday 17 February 2014

Tom's nCloth quest

After days and days of tutorials and repetitions I think I've finally worked out this nCloth business. All I wanted was for the tail of his coat to be nCloth so that it would react to him and the world around him without needing to be rigged and animated (looking impressive in the process), this caused many problems though as I couldn't get to grips with the basics of it. I think I've got it down now, we'll just have to see how well it works when rigged and moving.


Saturday 15 February 2014

Testing nparticles from Jake

so there is a few shots in our film that require moving fluid in a bottle, and one shot where the character pours some out into a plant pot. so i have been messing around and trying to figure out nparticles and creating this gooey plant food substance and have it react with the vial. so i have been learning all about how to create ncache and optimising the scene for playback, it's quite a complicated one but i got there in the end.

TA DA!

Friday 14 February 2014

Tom's first post

After a long and arduous game of catch up I'm somewhat at the same level as Jake now. The Charlatan has been modelled, unwrapped and textured, and I've finally gotten through building all of the props.


This is the humble beginnings of the Charlatan. I always envisaged the proportions and stature of this character being slightly more exaggerated and cartoon like than the other characters thanks to his particularly dastardly and larger-than-life persona, but I'm being careful to make sure he looks right with the other characters.


Here, he's nearing completion but there's still kinks to fix. I've gone too far with some of the proportions (arms, hands, facial features) and bits of geometry could do with being tidied but the original design is shining through and the finished product is nearly in sight.


And finally, a render of the basically finished Charlatan. Like cleaning, modelling is a job that is never quite done and I'm sure there'll be a tweek or two to be made before rigging, but I'm happy enough with this for it to be rigged (which is exciting). Unlike Jake and Pat I've never rigged a character before but I'm hoping a combination of enthusiasm, their expertise and my fondness of problem solving will get me through.

Tuesday 11 February 2014

Lastly from Jakes posts for a bit

I have been slaving at this environment for weeks. the models are made from the original designs. the amount of textures, so many textures, too many textures, i think theres about 105 psd networks going on in this scene.

there is a lot of stuff going on here but, with the right lighting and some fancy mental ray we got what we want, some pretty renders and a good theme


I have been playing around with different lights to try and get that, warm feel on the farm, a lovely rural American sundown. here's a couple of tests  


and here is a pretty render

The rest of the son

So anyway heres the rest of the Son, i Don't have any progression pictures unfortunately, but you know how it is, you put your headphones in, start modelling and, ta da, few hours later you realise, oh i'm finished, oh well, sweet! 

Anyway next up is blend-shapes, and some sweet poses after rigging, well excited to get him moving  


character modelling, Son, the beginning

so we have been modelling and texturing for a while now, so we have had a play with getting some nice renders on the go just to make sure we have the original theme we wanted, I (jake) will show you some of the changed we made since design.

When modelling the son's head, we noticed that the shape was not really fit for 3d, i'll post a picture showing the first failed model compared to the one we decided to carry on with

i mean, from here you can see, the topology is wrong, the spacing of the geometry looked like a disaster, and the shape of the head just wasn't practical, this model was going nowhere.

This second model, looked a lot better, I had managed to capture the character back from the original designs and put it into the 3D model, the geometry needs a good clean but, he looks alright. i guess we added to much to his design and ended up ruining him, but here I modelled him from an older design. 


(here's the old design)


I almost forgot, here's the expression sheet, so you have an idea of what his head should have looked like.


some more character design

With the film, we really wanted to have a theme of 1920's prohibition, where people are poor, working for peanuts, cheating and stealing their way into fortune. Here are some of the final designs of the characters, environment and props that we will start modelling from, we have the van of the charlatan, the farm and three characters. 


Greetings all

Hello everyone, here you will find the blog of  'Growing Pains', a short film created by Jake Love, Pat Bucknall and Tom priest, three animation students from salford university. We have decided to create this blog rather late into production, but from here we can show all of the work that had led up to what we have today. This first entry is by Jake, and i will show what i can all the designs we have come up with and what the film is about.

'Son and father own a dying farm, when they are visited by a seemingly helpful salesman and his plant growth elixir'

first off lets start with a few pics of our original designs the Father, the Son, and the Charlatan.

Here we have a load of character designs from the past we all have pretty different style drawings, so we decided to give the job of art director to Tom, and he will draw the designs in his style (subject to translation into 3d).