http://vimeo.com/95459704
Wednesday 4 June 2014
Monday 31 March 2014
Tuesday 11 March 2014


Wednesday 5 March 2014
Charlatans Van
Yo, this is the finished version of the Charlatans van, it has been modelled textured and rigged by Pat. you can see some earlier designs on previous posts but this is a short animation test just to show you how its going to work. It has constraints on the wheels and suspension to give it that bouncy effect when it accelerates and breaks.
VAN test <-- link

VAN test <-- link
Friday 28 February 2014
SET DRIVEN KEYS, in simple english
Yo all, Jake here, i keep getting Q's about set driven keys, i know you can look anywhere on the internet and find info on them but i'm posting this just expand the information going, and i will do a quick walk though on set driven keys on blend shapes, so here we go.
step 1. make a blend shape, duplicate your original model and manipulate the vertices until you're happy with the finished shape, you can make this by clicking the duplicated model then shift selecting the original, then, going into window > animation editors > blend shape, then go into edit blend shape > create blend shape.


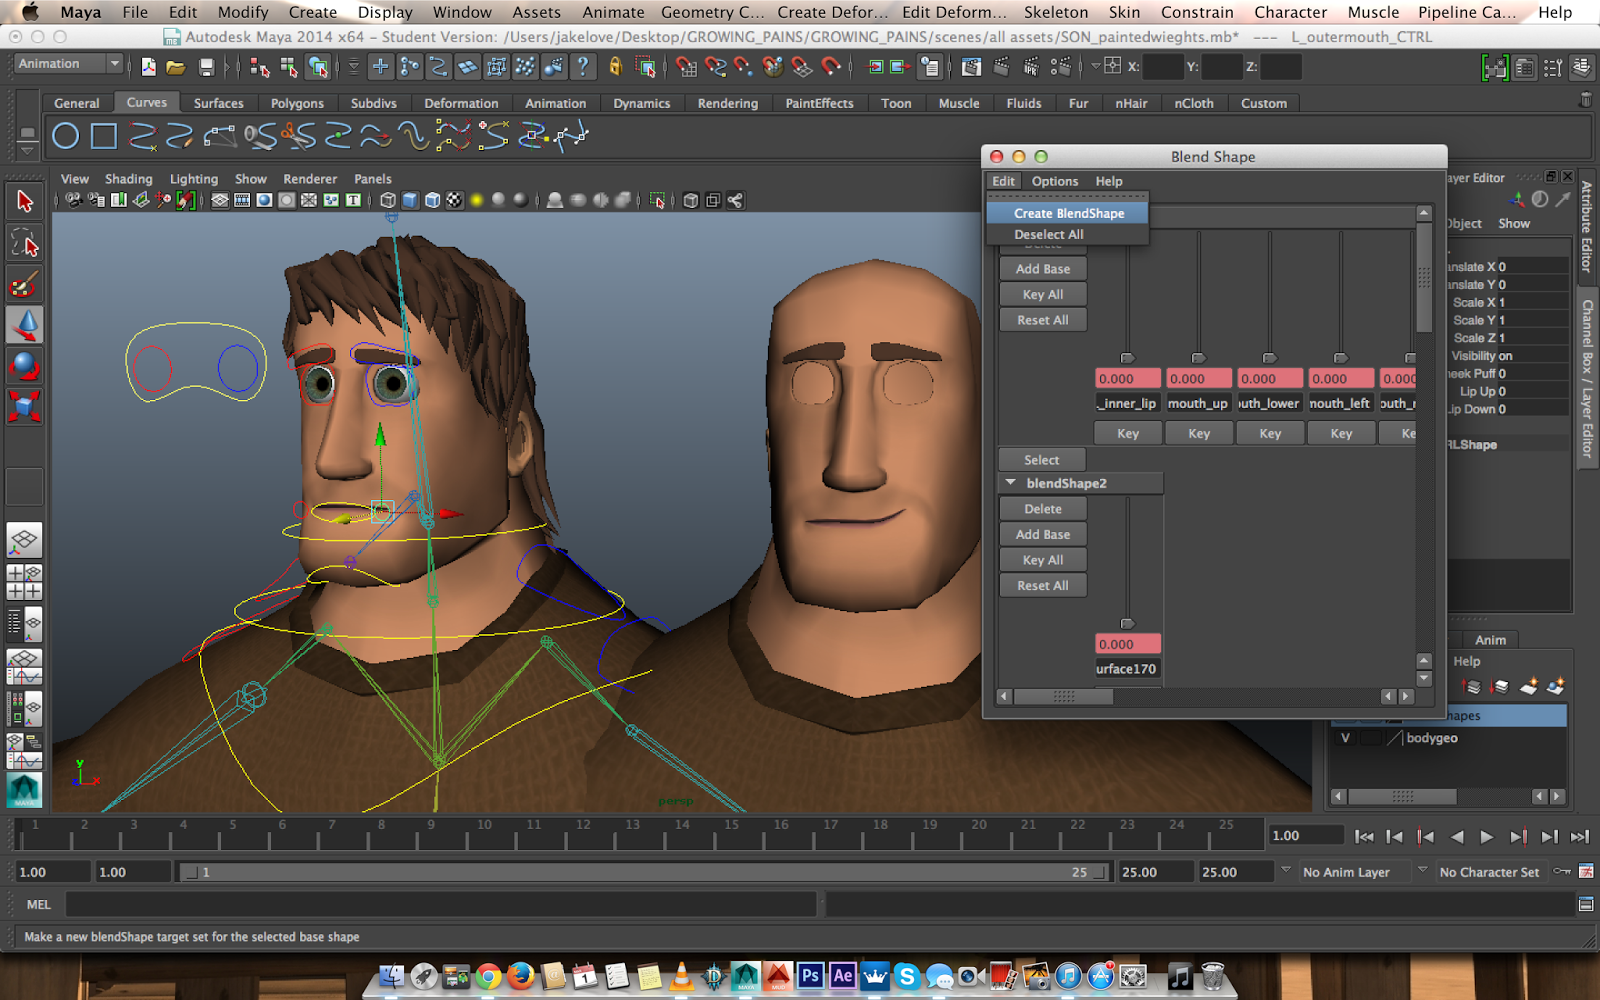

step 3. now, you can choose weather to add an attribute, by opening up the attributes, and clicking edit > add attribute or right click on translate, rotate, scale axis to create the driven key, in this example we are going to use a smile with the Y axis.
step 4. open your blend shape editor (refer to step . 1) right click on the 0.00 below the control handle and click SET DRIVEN KEY, when your little option box opens up you need to click on your controller. Press load driver (this will drive the blend shape in the axis or attribute you want to control) then on the top part of the window (where your controller appears) click on the attribute that you want the driver to move in in this example press translate Y.
step 5. don't move the controller, press KEY, so that it knows where to start from
step 6. move your controller to where you want the blend shape to move using the Y axis (or turn your custom attribute to 10 or whatever you put the maximum).

step 7. turn your blend shape on (using the blend shape editor), and press key, TA DA! now, unless my explanation is crap, your controller should move your blend shape about and you can use this method for the rest of them and have a nice looking rig.
just so you know, you can make your rig and do blend shapes afterwords or before skinning. also it is better to skin your rig in separate parts because with blend shapes you will run into less problems.
also feel free to comment on this method of retrieving info
step 1. make a blend shape, duplicate your original model and manipulate the vertices until you're happy with the finished shape, you can make this by clicking the duplicated model then shift selecting the original, then, going into window > animation editors > blend shape, then go into edit blend shape > create blend shape.
step 2. create controller, for the mouth, eyes, eyebrows, whatever you fancy (make sure you freeze your, transformations) and parent them to the head controller for your rig, or just the head geometry if you are practising.
step 3. now, you can choose weather to add an attribute, by opening up the attributes, and clicking edit > add attribute or right click on translate, rotate, scale axis to create the driven key, in this example we are going to use a smile with the Y axis.
step 4. open your blend shape editor (refer to step . 1) right click on the 0.00 below the control handle and click SET DRIVEN KEY, when your little option box opens up you need to click on your controller. Press load driver (this will drive the blend shape in the axis or attribute you want to control) then on the top part of the window (where your controller appears) click on the attribute that you want the driver to move in in this example press translate Y.
step 5. don't move the controller, press KEY, so that it knows where to start from
step 6. move your controller to where you want the blend shape to move using the Y axis (or turn your custom attribute to 10 or whatever you put the maximum).
just so you know, you can make your rig and do blend shapes afterwords or before skinning. also it is better to skin your rig in separate parts because with blend shapes you will run into less problems.
also feel free to comment on this method of retrieving info
Monday 24 February 2014

Rigging and stuff
yo, so we have been very busy making the rigs for these characters, and they're coming along nicely, so ill show what we've been up to. Basically, we're making blend shape rigs, with quite a basic set up, set driven keys in the hands and feet, using a reverse foot joint system.


The father and Charlatan both are wearing long sleeve clothes so their wrists are hidden by the cuffs of their tops, whereas the son has rolled up sleeves, and he is rather muscly so i had to find a way of giving him a forearm twist. This is so the arm can pronate and supernate, using a method close to a quaternion slerp. It uses multi/divide nodes to half the rotation of the previous joint (or whatever divide i choose) mine was 0.500, 0.500, 0.250.

Subscribe to:
Posts (Atom)